免费搭建wordpress博客郑州网站排名优化外包
文章目录
- 1、thymeleaf
- 2、依赖部分
- 3、定义Controller
- 4、创建静态页面
- 5、WebSecurityConfigurerAdapter
- 6、权限相关
- 7、当用户没有某权限时,页面不展示该按钮

1、thymeleaf
查了下读音,leaf/li:f/,叶子,前面的单词发音和时间time一样。
- 官网:https://www.thymeleaf.org/
- 参考中文文档:https://fanlychie.github.io/post/thymeleaf.html

Thymeleaf is a modern server-side Java template engine for both web and standalone environments.
即Thymeleaf是适用于Web和独立环境的现代服务器端Java 模板引擎 。模板引擎的作用就是使用户界面与业务数据(内容)分离,就是做好一个模板后套入对应位置的数据,最终以html的格式展示出来。知乎上有个很形象的例子:
=======================================================
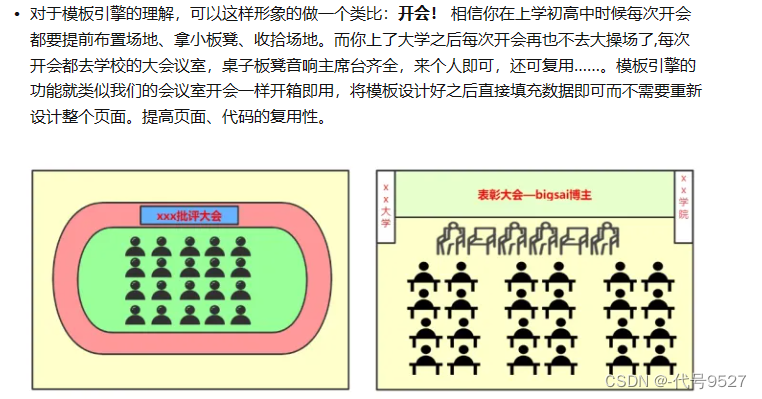
简单说就是,没模板引擎,就像高中操场开会,桌子、板凳、场地都要现搬现搭。而模板引擎的作用就像大学开会,有专门会议室,板凳桌子设备都准备好了,今天学院A进来用了,明天学院B进来用了,学院A、B就像数据。
将模板设计好之后直接填充数据即可而不需要重新设计整个页面,开箱即用,提高页面、代码的复用性。
市面上开源的第三方的模板引擎也比较多,有Thymeleaf、FreeMaker、Velocity等
2、依赖部分
引入thymeleaf依赖:
<dependency><groupId>org.springframework.boot</groupId><artifactId>spring-boot-starter-thymeleaf</artifactId>
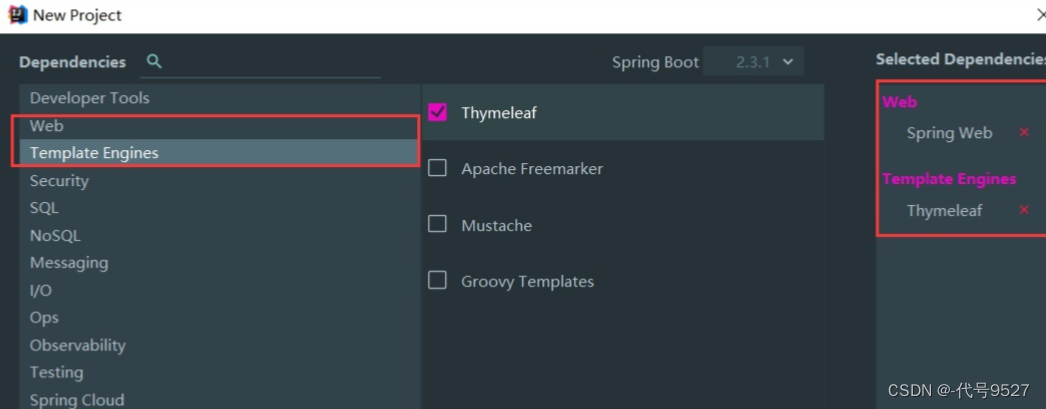
</dependency>当然如果是新创建项目,直接勾选热门依赖就行:
修改配置文件:
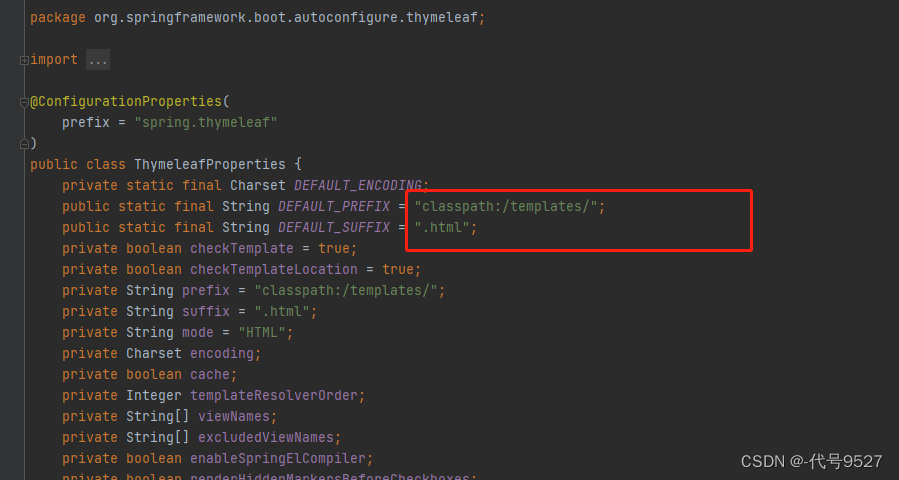
spring:thymeleaf:cache: false # 开发阶段可以先不使用缓存check-template: true # 检查thymeleaf模板是否存在之所以不使用缓存,是为了临时有改动时,点一下小锤子就能看效果:

在IDEA添加thymeleaf文件模板,方便以后使用:File-Setting
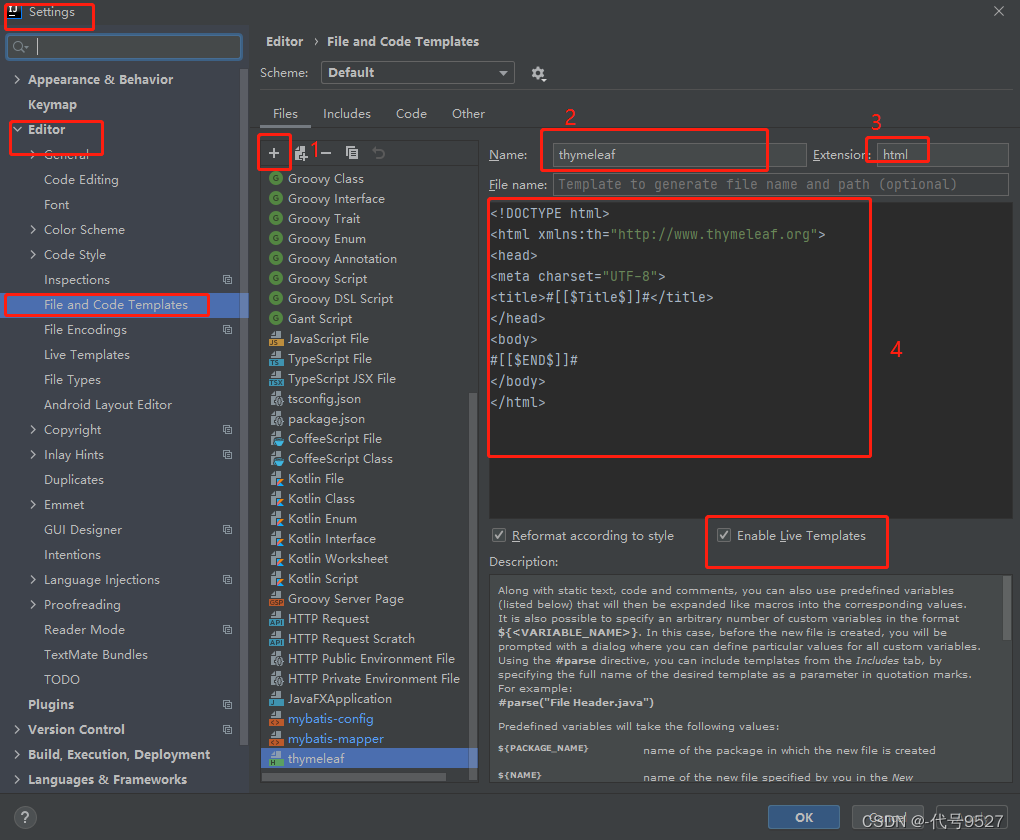
模板名称thymeleaf ,扩展名html,内容如下:
<!DOCTYPE html>
<html xmlns:th="http://www.thymeleaf.org">
<head>
<meta charset="UTF-8">
<title>#[[$Title$]]#</title>
</head>
<body>
#[[$END$]]#
</body>
</html>PS:
#[[$Title$]]# #[[$END$]]# 这两处的作用是:
当你新建一个模板页面时,在<title>标签中输入标题内容后,只需要点击回车键,光标就会直接跳到<body>内,省去了你挪动鼠标,或者挪动方向键的步骤,也可以给你节省一点点时间。
也可在IDEA中安装html转thymeleaf的插件:

3、定义Controller
//这里别用RestController了,不再返回一个json对象或者普通字符串了
@Controller
@RequestMapping("/login")
public class LoginController {/*** 跳转到登陆页面*/@RequestMapping("/toLogin")    //GET、POST都行的意思public String toLogin(){return "login";}}
上面的这个return "login"字符串,是返回thymeleaf的逻辑视图名,物理视图 = 前缀 + 逻辑视图 + 后缀,即/templates/ + login + .html(点住application.yaml文件中thymeleaf的配置查看源码:
再定义登录成功后进入主页的controller,返回逻辑视图名main(随便起的):
@Controller
@RequestMapping("/index")
public class IndexController {/*** 登录成功后进入主页*/@RequestMapping("/toIndex")public String toIndex(){return "main";}
}
4、创建静态页面
在templates下面创建login.html和main.html:(放到类路径中的resource下面)
<!DOCTYPE html>
<html xmlns:th="http://www.thymeleaf.org">
<head><meta charset="UTF-8"><title>用户登陆</title>
</head>
<body>
<h2>登录页面</h2>
<form action="/login/doLogin" method="post"><table><tr><td>用户名:</td><td><input type="text" name="uname" value="thomas"></td></tr><tr><td>密码:</td><td><input type="password" name="pwd"></td><span th:if="${param.error}">用户名或者密码错误</span></tr><tr><td colspan="2"><button type="submit">登录</button></td></tr></table>
</form>
</body>
mian.html内容:
<!DOCTYPE html>
<html lang="en">
<head><meta charset="UTF-8"><title>系统首页</title>
</head>
<body>
<h1 align="center">系统首页</h1>
<a href="/student/query">查询学生</a>
<br>
<a href="/student/add">添加学生</a>
<br>
<a href="/student/update">更新学生</a>
<br>
<a href="/student/delete">删除学生</a>
<br>
<a href="/student/export">导出学生</a>
<br>
<br><br><br>
<h2><a href="/logout">退出</a></h2>
<br>
</body>
</html>
5、WebSecurityConfigurerAdapter
修改安全配置类:
@EnableGlobalMethodSecurity(prePostEnabled = true)
//@Configuration
@Slf4j
public class WebSecurityConfig extends WebSecurityConfigurerAdapter {//编码器@Beanpublic PasswordEncoder passwordEncoder(){return new BCryptPasswordEncoder();}@Overrideprotected void configure(HttpSecurity http) throws Exception {//设置登陆方式http.formLogin()//使用用户名和密码的登陆方式.usernameParameter("uname") //页面表单的用户名的name,上面login.html中定义的用户名的参数名.passwordParameter("pwd")//页面表单的密码的password,上面login.html中定义的密码的参数名.loginPage("/login/toLogin") //自己定义登陆页面的地址.loginProcessingUrl("/login/doLogin")//配置登陆的url.successForwardUrl("/index/toIndex") //登陆成功跳转的页面,成功跳首页.failureForwardUrl("/login/toLogin")//登陆失败跳转的页面,失败跳登录页.permitAll();//配置退出方式http.logout().logoutUrl("/logout").logoutSuccessUrl("/login/toLogin").permitAll();//配置路径拦截 的url的匹配规则http.authorizeRequests()//任何路径要求必须认证之后才能访问.anyRequest().authenticated();// 先禁用csrf跨站请求攻击保护  后面可以使用postman工具测试,注意要禁用csrfhttp.csrf().disable();}
}
此时登录后可以跳转首页了:

6、权限相关
修改上一篇中的StudentController,写接口,返回不同的逻辑视图名称字符串。并给接口加权限校验。
@Controller   //返回的不是一个字符串,是一个视图名
@Slf4j
@RequestMapping("/student")
public class StudentController {@GetMapping("/query")@PreAuthorize("hasAuthority('student:query')")public String queryInfo(){return "user/query";   //:templates/ + user/query + .html    }@GetMapping("/add")@PreAuthorize("hasAuthority('student:add')")public String addInfo(){return "user/add";}@GetMapping("/update")@PreAuthorize("hasAuthority('student:update')")public String updateInfo(){return "user/update";}@GetMapping("/delete")@PreAuthorize("hasAuthority('student:delete')")public String deleteInfo(){return "user/delete";}@GetMapping("/export")@PreAuthorize("hasAuthority('student:export')")public String exportInfo(){return "/user/export";}
}
在templates/user下面创建学生管理的各个页面,export.html:
<!DOCTYPE html>
<html lang="en" xmlns:th="http://www.thymeleaf.org"
>
<head><meta charset="UTF-8"><title>系统首页-学生管理</title>
</head>
<body>
<h1 align="center">系统首页-学生管理-导出</h1>
<a href="/index/toIndex">返回</a>
<br>
</body>
</html>
add.html:
<!DOCTYPE html>
<html lang="en">
<head><meta charset="UTF-8"><title>系统首页-学生管理</title>
</head>
<body>
<h1 align="center">系统首页-学生管理-新增</h1>
<a href="/index/toIndex">返回</a>
<br>
</body>
</html>
update.html:
<!DOCTYPE html>
<html lang="en">
<head><meta charset="UTF-8"><title>系统首页-学生管理</title>
</head>
<body>
<h1 align="center">系统首页-学生管理-更新</h1>
<a href="/index/toIndex">返回</a>
<br>
</body>
</html>
delete.html:
<!DOCTYPE html>
<html lang="en">
<head><meta charset="UTF-8"><title>系统首页-学生管理</title>
</head>
<body>
<h1 align="center">系统首页-学生管理-删除</h1>
<a href="/index/toIndex">返回</a>
<br>
</body>
</html>
query.html:
<!DOCTYPE html>
<html lang="en">
<head><meta charset="UTF-8"><title>系统首页-学生管理</title>
</head>
<body>
<h1 align="center">系统首页-学生管理-查询</h1>
<a href="/index/toIndex">返回</a>
<br>
</body>
</html>
在static/error下面创建403.html,当没有权限的时候,就会使用这里的403页面代替框架自带的403页面 :
<!DOCTYPE html>
<html lang="en">
<head><meta charset="UTF-8"><title>403</title>
</head>
<body>
<h2>403:你没有权限访问此页面</h2>
<a href="/index/toIndex">去首页</a>
</body>
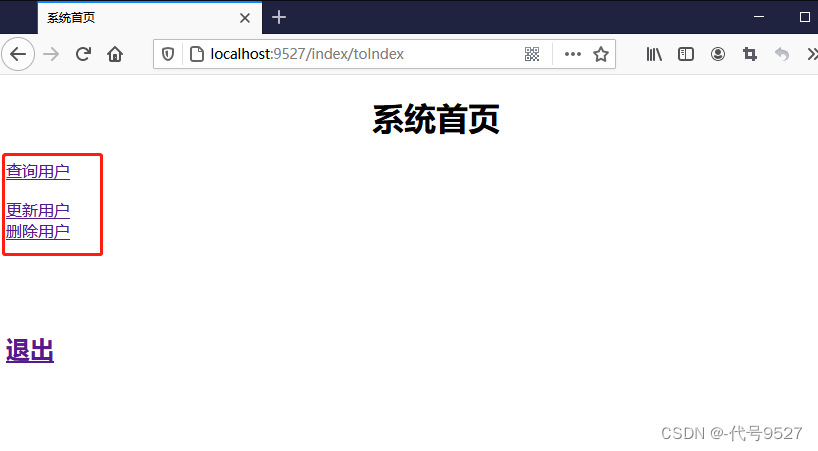
</html>查看效果:

7、当用户没有某权限时,页面不展示该按钮
当用户点击页面上的链接请求到后台之后没有权限会跳转到403,那么如果用户没有权限,对应的按钮就不显示出来,这样岂不是更好吗。下面开始实现:
- 引入依赖
<dependency><groupId>org.thymeleaf.extras</groupId><artifactId>thymeleaf-extras-springsecurity5</artifactId>
</dependency>- 修改首页代码,在标签的sec属性中加入对应的所需权限
<!DOCTYPE html>
<html lang="en" xmlns:th="http://www.thymeleaf.org"xmlns:sec="http://www.thymeleaf.org/extras/spring-security">
<head><meta charset="UTF-8"><title>系统首页</title>
</head>
<body>
<h1 align="center">系统首页</h1>
<a href="/student/query" sec:authorize="hasAuthority('student:query')" >查询用户</a>
<br>
<a href="/student/add" sec:authorize="hasAuthority('student:save')" >添加用户</a>
<br>
<a href="/student/update" sec:authorize="hasAuthority('student:update')" >更新用户</a>
<br>
<a href="/student/delete" sec:authorize="hasAuthority('student:delete')" >删除用户</a>
<br>
<a href="/student/export" sec:authorize="hasAuthority('student:export')" >导出用户</a>
<br>
<br><br><br>
<h2><a href="/logout">退出</a></h2>
<br>
</body>
</html>
重启,此时的效果: